google analytics

Showing posts with label Visual Studio. Show all posts

Friday, November 13, 2009

.NET application logging with Log4net in Console , File & Database

Hello All

Today I will go through logging with Log4net. Log4Net is a logging framework ( a rich library) for .NET. Log4Net is popular for its simplicity and robustness. We can write log in various way though we generally write log only in file we we can also mail log, show in console,save in datatbase as well as write in file in different ways.

First we have to download the Log4Net and add the log4net.dll in our implementation project. In the example I have take 2 projects named LogWriter and LogRunner accordingly, In one project I have implemented the logging and in another I execute that logging method.

My project structure is as image bellow :

In the LogWriter I have take two class as bellow :

LogLevel.cs: In this class I simply define a enum which basically helps to define my log level in my LogUtil class.

namespace LogWriter
{
    public enum LogLevel
    { 
        DEBUG,
        ERROR,
        FATAL,
        INFO,
        WARN    
    }
}

LogUtil.cs: In this class I have a static method named WriteLog which take 2 parameters one define log level and another take log message as string.

using log4net;
using log4net.Config;

namespace LogWriter
{
    public static class LogUtil
    {
        private static ILog logger = LogManager.GetLogger(typeof(LogUtil));

        static LogUtil()
        {
            XmlConfigurator.Configure();
        }

        public static void WriteLog(LogLevel logLevel,string log)
        {
            if (logLevel.Equals(LogLevel.DEBUG))
            {
                logger.Debug(log);
            }
            else if (logLevel.Equals(LogLevel.ERROR))
            {
                logger.Error(log);
            } 
            else if (logLevel.Equals(LogLevel.FATAL))
            {
                logger.Fatal(log);
            } 
            else if (logLevel.Equals(LogLevel.INFO))
            {
                logger.Info(log);
            } 
            else if (logLevel.Equals(LogLevel.WARN))
            {
                logger.Warn(log);
            }             
        
        }
    }
}

As I am writing a  console application so my mail runner file is Program.cs which is as bellow but you can follow the same procedure in different place as per you requirement.

using System;
using LogWriter;

namespace LogRunner
{
    class Program
    {
        static void Main(string[] args)
        {
            try {
                throw new Exception();
            }

            catch (Exception exc)
            {
                    LogUtil.WriteLog(LogLevel.DEBUG, "Debug mode logging");
                    LogUtil.WriteLog(LogLevel.ERROR, "Error mode logging");
                    LogUtil.WriteLog(LogLevel.FATAL, "Fatal mode logging");
                    LogUtil.WriteLog(LogLevel.INFO, "Info mode logging");
                    LogUtil.WriteLog(LogLevel.WARN, "Warn mode logging");
    
                    Console.ReadKey();
            }
        }
    }
}

Now one of the most important thing I will focus is log4net configuration. We can configure it from web.config or app.config . In my example I have configured it app.config file in my LogRunner project. In the app.config file follow the commented section.

My configuration file is as bellow , please go through the commented line to get know in detail such as log file rolling, max log file number & size, Log level etc.
<?xml version="1.0" encoding="utf-8" ?>

<configuration>

    <configSections>

        <section name="log4net" type="log4net.Config.Log4NetConfigurationSectionHandler, log4net" />

    </configSections>


    <log4net>

        <appender name="LogFileAppender" type="log4net.Appender.RollingFileAppender">

            <!-- Log file locaation -->
            
            <param name="File" value="C:\Users\sanzeeb\Documents\Visual Studio 2008\Projects\Solution1\LogWriter\Log\" />

            <param name="AppendToFile" value="true" />

            <!-- Maximum size of a log file -->
            <maximumFileSize value="2KB" />

            <!--Maximum number of log file -->
            <maxSizeRollBackups value="8" />

            <!--Set rolling style of log file -->
            <param name="RollingStyle" value="Composite" />

            <param name="StaticLogFileName" value="false" />

            <param name="DatePattern" value=".yyyy-MM-dd.lo\g" />

            <layout type="log4net.Layout.PatternLayout">

                <param name="ConversionPattern" value="%d [%t] %-5p  %m%n" />

            </layout>

        </appender>

        <!-- Appender layout fix to view in console-->
        <appender name="ConsoleAppender" type="log4net.Appender.ConsoleAppender" >

            <layout type="log4net.Layout.PatternLayout">

                <param name="Header" value="[Header]\r\n" />

                <param name="Footer" value="[Footer]\r\n" />

                <param name="ConversionPattern" value="%d [%t] %-5p  %m%n" />

            </layout>

        </appender>

      
        <!-- Database appender -->

        <!--
        You need to create a table as bellow to insert log in database for MSSQL server.
        
        CREATE TABLE [dbo].[Log] (
        [Id] [int] IDENTITY (1, 1) NOT NULL,
        [Date] [datetime] NOT NULL,
        [Thread] [varchar] (255) NOT NULL,
        [Level] [varchar] (50) NOT NULL,
        [Logger] [varchar] (255) NOT NULL,
        [Message] [varchar] (4000) NOT NULL,
        [Exception] [varchar] (2000) NULL
        )
        -->

        <appender name="AdoNetAppender" type="log4net.Appender.AdoNetAppender">
            <bufferSize value="100" />
            <connectionType value="System.Data.SqlClient.SqlConnection, System.Data, Version=1.0.3300.0, Culture=neutral, PublicKeyToken=b77a5c561934e089" />
            <connectionString value="Data Source=SANZEEB-PC\SQLEXPRESS;Initial Catalog=AppTesterDB;Integrated Security=True" />
            <commandText value="INSERT INTO Log ([Date],[Thread],[Level],[Logger],[Message],[Exception]) VALUES (@log_date, @thread, @log_level, @logger, @message, @exception)" />
            <parameter>
                <parameterName value="@log_date" />
                <dbType value="DateTime" />
                <layout type="log4net.Layout.RawTimeStampLayout" />
            </parameter>
            <parameter>
                <parameterName value="@thread" />
                <dbType value="String" />
                <size value="255" />
                <layout type="log4net.Layout.PatternLayout">
                    <conversionPattern value="%thread" />
                </layout>
            </parameter>
            <parameter>
                <parameterName value="@log_level" />
                <dbType value="String" />
                <size value="50" />
                <layout type="log4net.Layout.PatternLayout">
                    <conversionPattern value="%level" />
                </layout>
            </parameter>
            <parameter>
                <parameterName value="@logger" />
                <dbType value="String" />
                <size value="255" />
                <layout type="log4net.Layout.PatternLayout">
                    <conversionPattern value="%logger" />
                </layout>
            </parameter>
            <parameter>
                <parameterName value="@message" />
                <dbType value="String" />
                <size value="4000" />
                <layout type="log4net.Layout.PatternLayout">
                    <conversionPattern value="%message" />
                </layout>
            </parameter>
            <parameter>
                <parameterName value="@exception" />
                <dbType value="String" />
                <size value="2000" />
                <layout type="log4net.Layout.ExceptionLayout" />
            </parameter>
        </appender>

        <root>

            <level value="DEBUG" />

            <!--
            Log level priority in descending order:
            
            FATAL = 1 show  log -> FATAL 
            ERROR = 2 show  log -> FATAL ERROR 
            WARN =  3 show  log -> FATAL ERROR WARN 
            INFO =  4 show  log -> FATAL ERROR WARN INFO 
            DEBUG = 5 show  log -> FATAL ERROR WARN INFO DEBUG
            -->

            <!—To write log in file -->
            <appender-ref ref="LogFileAppender" />

            <!--To view log in console -->
            <appender-ref ref="ConsoleAppender" />
            
            <!--To write log in file batabase -->
            <appender-ref ref="AdoNetAppender" />

        </root>

    </log4net>

</configuration>

Hope this will help to improve your logging in your .NET application.

Thanks

That’s all for today.

BYE

Saturday, June 13, 2009

LinkButton ,Label inside Repeater - ASP.NET

Hello All

Today I will show you how to fire  Link Button's event with argument and initialize a label inside of a repeater. To do that first we have to take LinkButton and a Label control inside the ItemTemplate of the repeater. Then we have to initialize the the Label from OnItemDataBound event of the repeater. In the following code blocks its shown how to perform the job.

Following is my Default.aspx file:

<%@ Page Language="C#" AutoEventWireup="true" CodeBehind="Default.aspx.cs" Inherits="TestProject._Default" %>

<!DOCTYPE html PUBLIC "-//W3C//DTD XHTML 1.0 Transitional//EN" "http://www.w3.org/TR/xhtml1/DTD/xhtml1-transitional.dtd">
<html xmlns="http://www.w3.org/1999/xhtml">
<head runat="server">
    <title></title>
</head>
<body>
    <form id="form1" runat="server">
    <div>
        Selected ID:<asp:Label ID="lblSelectedID" runat="server" Text=""></asp:Label>
        <br />
        <asp:Repeater ID="rptContent" runat="server" OnItemDataBound="rptContent_ItemDataBound">
            <ItemTemplate>
                <asp:Label ID="lblName" runat="server">
                </asp:Label>
                <asp:LinkButton ID="lnkShowData" runat="server" OnCommand="LinkButton_Command" CommandArgument='<%# Eval("key") %>'
                    Text="[Show]" CommandName="Show"></asp:LinkButton>
                <br />
            </ItemTemplate>
        </asp:Repeater>
    </div>
    </form>
</body>
</html>

In the above code I have bind the "key" as CommandArgument in LinkButton which will be initialize form the code behind file.

My code behind is as following:

using System;
using System.Collections.Generic;
using System.Web.UI;
using System.Web.UI.WebControls;

namespace TestProject
{
    public partial class _Default : System.Web.UI.Page
    {
        protected void Page_Load(object sender, EventArgs e)
        {
            rptContent.DataSource = this.userInformation();
            rptContent.DataBind();
        }

       // Fire the link button event from inside repeater.
       protected void LinkButton_Command(object sender, CommandEventArgs e)
        {
           lblSelectedID.Text = e.CommandArgument.ToString();
        }

        protected void rptContent_ItemDataBound(object sender, RepeaterItemEventArgs e)
        {
            // find the label control by id
            Label lblDynaLabel = (Label)(e.Item.FindControl("lblName"));


            // bind the data from repeater data source (value from the dictionary)with the label control.
            lblDynaLabel.Text = DataBinder.Eval(e.Item.DataItem,"value").ToString();
        }

        #region Private method

        private Dictionary<int, string> userInformation()
        {
            Dictionary<int, string> userData = new Dictionary<int, string>();

            userData.Add(1, "Max");
            userData.Add(2, "Top");
            userData.Add(3, "Avg");

            return userData;
        }
        #endregion
    }
}

The output will be as bellow:

Selected ID:1
Max [Show]
Top [Show]
Avg [Show]

In the private method section I have created a simple mathod named userInformation, which contains dictionary data collection to bind it with repeater.Hope that above code blocks will help.

Thanks

That's all for the day.
BYE

User ScrumPad for your Agile based projects.

Tuesday, March 31, 2009

Creating WCF Service

Hello all

Today I will try to demonstrate how to create simple web service through WCF. To get into WCF first we have to know some basic principal of WCF and its "ABC".

Address : the location of the service.

Bind: how to get service.

Contract: service action.

In this tutorial I will not describe details about WCF.My basic focus will be on creating a WCF service through Visual Studio 2008

First open a new WCF project:

In my sample project I have named "TestWCFService" for creating the service.

In the solution explorer you will found IService1.cs interface , Service1.svc file and a code behind file Service1.svc.cs

In my project I have renamed those as IDataService.cs, DataService.svc and DataService.svc.cs accordingly. To change the markup file of DataService.svc right click on the DataService.svc file in solution explorer and press "View Markup" as bellow

and change the Service according to you code as bellow.

<%@ ServiceHost Language="C#" Debug="true" Service="TestWCFService.DataService" CodeBehind="DataService.svc.cs" %>

In the solution my IDataSevice.cs is as bellow:

using System.Runtime.Serialization;
using System.ServiceModel;

namespace TestWCFService
{
    
    [ServiceContract]
    public interface IDataService
    {

        [OperationContract]
        UserInformation GetUserDataFromService();

        [OperationContract]
        string GetUserRestrictionFromService(string userID);
        
        // TODO: Add your service operations here
    }


    // Use a data contract as illustrated in the sample below to add composite types to service operations.
    [DataContract]
    public class UserInformation
    {

        [DataMember]
        public string UserName { get; set; }

        [DataMember]
        public string UserLocation { get; set; }

      
        public string UserRestriction(int userID)
        {
            if (userID.Equals(1))
                return "approve";
            else
                return "rejected";
        }
       
    }
}

My DataService.svc.cs file is as bellow :

using System;

namespace TestWCFService
{
    // NOTE: If you change the class name "Service1" here, you must also update the reference to "Service1" in Web.config and in the associated .svc file.
    public class DataService : IDataService
    {
        #region IDataService Members

        public UserInformation GetUserDataFromService()
        {
            return new UserInformation() { UserName = "Tanvir", UserLocation = "Dhaka" };
        }

        public string GetUserRestrictionFromService(string userID)
        {

            UserInformation userInformation = new UserInformation();

            if (userInformation.UserRestriction(Int32.Parse(userID)).Equals("approve"))
                return String.Format("your user id is {0} and you are approved", userID);
            else
                return String.Format("your user id is {0} and you are not approved", userID);

        }

        #endregion
    }
}

And the most important thing is to change in system.servieModel section in Web.config file as bellow :

<system.serviceModel>
        <services>
            <service name="TestWCFService.DataService" behaviorConfiguration="TestWCFService.Service1Behavior">
                <!-- Service Endpoints -->
                <endpoint address="" binding="wsHttpBinding" contract="TestWCFService.IDataService">
                    <!-- 
              Upon deployment, the following identity element should be removed or replaced to reflect the 
              identity under which the deployed service runs.  If removed, WCF will infer an appropriate identity 
              automatically.
          -->
                    <identity>
                        <dns value="localhost"/>
                    </identity>
                </endpoint>
                <endpoint address="mex" binding="mexHttpBinding" contract="IMetadataExchange"/>
            </service>
        </services>
        <behaviors>
            <serviceBehaviors>
                <behavior name="TestWCFService.Service1Behavior">
                    <!-- To avoid disclosing metadata information, set the value below to false and remove the metadata endpoint above before deployment -->
                    <serviceMetadata httpGetEnabled="true"/>
                    <!-- To receive exception details in faults for debugging purposes, set the value below to true.  Set to false before deployment to avoid disclosing exception information -->
                    <serviceDebug includeExceptionDetailInFaults="false"/>
                </behavior>
            </serviceBehaviors>
        </behaviors>
    </system.serviceModel>

We have to change the underline and bold section up above according to you code and naming in our solution.

Thanks

That's all for the day.
BYE

User ScrumPad for your Agile based projects.

Friday, November 28, 2008

Isolated Unit Test of Business Logic With NMock in TDD

Hello All

In test driven development its always needed to test a particular project tested with make it isolate ( test with removing dependency from other projects ), In this scenario we virtually create the input set which will be produced from other projects(class,methods etc) and test whether our testable methods are functioning with that input set or not.

To do that we have to make mock of the dependent objects. In the example bellow I have shown how to test a business logic layer with isolating it from data access layer.I have created three projects Web.Data , Web.Core & BL.Test .

The Web.Data project contains the Data Access Layer which will be responsible for pulling data from the data source,but as we are isolating our business logic layer from this project so in the example I will not completely  implement our desired method( as it will not be executed).

To do that we need some tools such as NMock and NUnit . We will found the NMock.dll , nunit.core & nunit.framework in both of its bin folder where we extract or install those.

our Web.Data contains only two files one is IMockDAL.cs interface and MockDAL.cs class.

IMockDAL.cs interface :

using System.Collections.Generic;

namespace Web.Data
{
   public interface IMockDAL
    {
       /* The method will return a string list of
        * active member's name from data source .
        */
        List<string> GetNameListDAL(bool active);
    }
} 
MockDAL.cs Class :
using System;
using System.Collections.Generic;

namespace Web.Data
{
    public class MockDAL:IMockDAL
    {
        #region IMockDAL Members

        /* This method will not be executed during the test,
         * as we will do mock of this method.         
         */
       public List<string> GetNameListDAL(bool active)
        {
            throw new NotImplementedException();
        }

        #endregion
    }
}
In our Web.Core there are also two files , one is IEmployeeService.cs interface & EmployeeService.cs the class file. in this project we have to add reference of Web.Data project as it has a dependency over that.
IEmployeeService.cs  interface :
using System.Collections.Generic;
using Web.Data;

namespace Web.Core
{
   public interface IEmployeeService
    {
        IMockDAL MockDAL { set; get; }
        List<string> GetAllEmployee();
    }
}
EmployeeService.cs Class :
using System.Collections.Generic;
using Web.Data;

namespace Web.Core
{
   public class EmployeeService : IEmployeeService
    {
        /* The MockDAL property will be used to assign
         * DAL through our mock object.
         */
        public IMockDAL MockDAL { set; get; }

        public EmployeeService()
        {
            MockDAL = new MockDAL();        
        }

        #region IEmployeeService Members

        /* The "GetAllEmploye" will call the "GetNameListDAL"
         * from the mock object. For the sake of simplicity 
         * I just call the DAL,not did any other operation.
        */

        public List<string> GetAllEmployee()
        {
            return MockDAL.GetNameListDAL(true);
        }

        #endregion
    }
} 
In BL.Test project we have to add some reference as it have dependency over  couple of projects and DLLs . We have to add reference of Web.Data & Web.Core and we also have to add NMock.dll , nunit.core & nunit.framework .In this project we have a class file named MockTest.cs
using System.Collections.Generic;
using NMock2;
using NUnit.Framework;
using Web.Data;
using Web.Core;

namespace BL.Test
{
    [TestFixture]
    public class MockTest
    {
        /* Assign property of our object that will be executed.
         */
        public Mockery _mock;
        public IMockDAL _mockDAL;
        public IEmployeeService _employeeService; 

        [SetUp]
        public void init()
        {
            /* initializing our objects.
             */
            _mock = new Mockery();
            _mockDAL = _mock.NewMock<IMockDAL>();
            _employeeService = new EmployeeService();
            _employeeService.MockDAL = _mockDAL;

        }

        [Test]
        public void TestEmployeeCount()
        {
            /* In the list bellow we are creating our virtual list of
             * string, which we are expecting after calling the DAL
             * this list will be returned.
             */
            List<string> employeeList = new List<string>();
            string emp = "Maix";
            string emp2 = "Pain";
            employeeList.Add(emp);
            employeeList.Add(emp2);


            /* _mockDAL -> is our mocked DAL object.
             * GetNameListDAL -> is one of the method name of the _mockDAL object.
             * With(true) -> the single boolean parameter of the GetNameListDAL method.
             * employeeList -> The expecter return value from the GetNameListDAL method.
             */
            Expect.Once.On(_mockDAL).Method("GetNameListDAL").With(true).Will( Return.Value(employeeList));

            List<string> employeeListResult = _employeeService.GetAllEmployee();

            /* Verify the mock object is executed successfully with its expectation.
             */
            _mock.VerifyAllExpectationsHaveBeenMet();

            Assert.AreNotEqual(null, employeeListResult);
        }
    }
}
To make it run we can set the project as our startup project and configure the NUnit .

That's all for the day.

BYE
User ScrumPad for your Agile based projects. 
 

Friday, November 21, 2008

UI test with WatiN for TDD in .NET

Hello all

Today I will show how to test UI ( User Interfaces ) in .NET with WatiN . WatiN is UI test framework. Though its a very simple but i have felt the documentation is not rich enough with example. So i have taken an initiative to make it more userfriendly for the developers.

I will not emphasize on how to configure WatiN as its already well documented in the following links. What i will try to do is make familiar with HTML controls that's needed to be validated .

Follow accordingly to configure WatiN :

  1. Add reference as the documentation of WatiN, you dont have to follow the example which is documented there just add the reference.
  2. If you don't know how to add reference please see this and for NUnit see this
  3. Visit this link for a good CodeProject's example.

One of the common mistake we do is, open a class file in our website project and start the writing the test code in it, but what we have to do is make a new Class Project ,add reference in that project & select as startup project for NUnit test.

using WatiN.Core;
using NUnit.Framework;
using WatiN.Core.DialogHandlers;

namespace TestStie
{
  [TestFixture]
  public class AddArticleTest
    {

      [TestFixtureSetUpAttribute]
        public void SetUp()
        { 
        }

       [Test]
        public void TestAddArticle()
        {
            using (IE ie = new IE("http://localhost:2456/testsite/login.aspx"))
            {

                /*
                 * For textbox and textarea we have to use TextField() method and to search by 
                 * id of the control we have to use Find.ById() method & to fill the textbox 
                 * we have to use TypeText() method as following.                 
                 */

                ie.TextField(Find.ById("ctl00_UserName")).TypeText("maxpain");
                ie.TextField(Find.ById("ctl00_Password")).TypeText("c0de71~123");
               
                /*
                 * For make a check box cheked we have to do as following.                 
                 */
                ie.CheckBox(Find.ById("ctl00_chkActive")).Checked = true;
                
                /*
                 * To upload a file we have to do as bellow.
                 */
                ie.FileUpload(Find.ById("ctl00_LogoFile")).Set(@"C:\calligraphy.jpg");

                /*
                 * To selct a value form a dropdown list we have to follow as bellow.
                 * In the exmaple "Software Engineer" is selected item's value.
                 */
                ie.SelectList("ctl00_BodyPlaceHolder_ddlSkillCategory").Select("Software Engineer");

                /*
                 * For make a radio button cheked we have to do as following.                 
                 */
                ie.RadioButton(Find.ByName("ctl00$BodyPlaceHolder$rbPublish")).Checked = true;

                /*
                 * To click a link we have to do as bello
                 */
                ie.Link(Find.ByUrl("http://localhost:2456/testsite/AddArticle.aspx?id=3")).Click();

                /*
                 * To click a button we have to do as bellow.
                 */
                ie.Button(Find.ById("ctl00_LoginButton")).Click();

                /*
                 * Suppose we have to make confirm a delect action through JS confirmation box when we click 
                 * a link, then we have to do as follow.
                 */
                AlertDialogHandler alertDialogHandler = new AlertDialogHandler();
                ConfirmDialogHandler confirm = new ConfirmDialogHandler();
                using (new UseDialogOnce(ie.DialogWatcher, confirm))
                {
                    Link link = ie.Link(Find.ByUrl("http://localhost:2456/testsite/AllCaseStudy.aspx?id=5"));

                    link.ClickNoWait();
                    confirm.WaitUntilExists();
                    confirm.OKButton.Click();
                }
                ie.WaitForComplete();

                /*
                 * Now to check whether our operatin is successful or not we have to do assert test 
                 * as we do in unit test. Here ContainsText("xxxx") method returns true when it found
                 * the "xxxx" string in the page appear after any event perform.(generally we show
                 * a confirmation message after any successful event performed.) 
                 */
                Assert.IsTrue(ie.ContainsText("News Deleted successfuly"), "Deleted id not found.");
            }         
        }

        [TestFixtureTearDownAttribute]
        public void TearDown()
        {
        }
    }
}

Thats all for today.

BYE
User ScrumPad for your Agile based projects.

Wednesday, November 5, 2008

ASP.NET Form Authentication

Hello All

Today I will demonstrate how to do Form based authentication manually.Though it can be maintained through login controls which is provided by Visual Studio but sometime we need to do the task without using those controls and the required database.

First we have to perform validation for the user, then we needed to authenticate the user for different type of task according to the role of the user ( I will do role based authentication.) In my example I have a folder named "Secure" which can be access only by the Admin user. (in the following code I assume that U have done the validation for a user.)

  /* we are taking expire time duration form application settings file you may also hard coded this value.*/
double EXPIRETIMELIMIT = Convert.ToDouble(ConfigurationManager.AppSettings["EXPIRETIMELIMIT"]);

  FormsAuthentication.Initialize();
  FormsAuthentication.HashPasswordForStoringInConfigFile("password", "md5");
            
  StringBuilder roles = newStringBuilder();
  /* bellow i have added 2 roles , you may add roles according to your logic.*/
  roles.Append("Admin");
  roles.Append("Manager");
               
  FormsAuthenticationTicket ticket = new FormsAuthenticationTicket(1, "User Name", DateTime.Now, DateTime.Now.AddMinutes(EXPIRETIMELIMIT), true, roles.ToString(), FormsAuthentication.FormsCookiePath);         
  string hash = FormsAuthentication.Encrypt(ticket);      
  HttpCookie cookie = new HttpCookie(FormsAuthentication.FormsCookieName, hash);
/*We have to set the cookie expire time manually,its not working which we set in the parameter  of the FormsAuthenticationTicket's constructor .*/
 cookie.Expires = DateTime.Now.AddMinutes(EXPIRETIMELIMIT); 

 if(ticket.IsPersistent)
    cookie.Expires = ticket.Expiration;

 Response.Cookies.Add(cookie);

 Response.Redirect("Admin/Home.aspx");
Now open the the Global.asax file,if its not exist in your current solution add it as a new item. Then add the following code block as bellow,which will chek the authentication in each page request.
protected void Application_AuthenticateRequest(Object sender, EventArgs e)
   {
       if (HttpContext.Current.User != null)
       {
           if (HttpContext.Current.User.Identity.IsAuthenticated)
           {
               if (HttpContext.Current.User.Identity is FormsIdentity)
               {
                   FormsIdentity identity = (FormsIdentity)HttpContext.Current.User.Identity;

                   FormsAuthenticationTicket ticket = identity.Ticket;
//         UserData is the roles which we have assigned before.
                   string[] roles = ticket.UserData.Split(new Char[] {','});
                                     
                   HttpContext.Current.User = new System.Security.Principal.GenericPrincipal(identity, roles);
                   
               }            
           }        
       }    
   }
Now its the time to securing our folder from web.config  . When any Authorized user will try to access in the Admin folder then this will check the "Admin" role for the user.
<authentication mode="Forms">
        <forms name="MYWEBAPP.ASPXAUTH"  loginUrl="TeleMarketerLogin.aspx" protection="All" path="/"/>  
    </authentication>
    <authorization>
        <deny users="?"/>
        <allow roles="Manager,Admin"/>
        <deny users="*"/>
    </authorization>

<location path="Secure">
    <system.web>
        <authorization>
        <deny users="?"/>
        <allow roles="Admin"/>
        <deny users="*"/>
        </authorization>
    </system.web>
</location>

<location path="App_Themes">
    <system.web>
        <authorization>
            <allow users="*"/>
        </authorization>
    </system.web>
</location>
thats all for today.
BYE
User ScrumPad for your Agile based projects.

Wednesday, October 22, 2008

Web service creation & consuming with ASP.NET

Hello all

Today I will show how to create web service with VS2008 and consume it in different application.
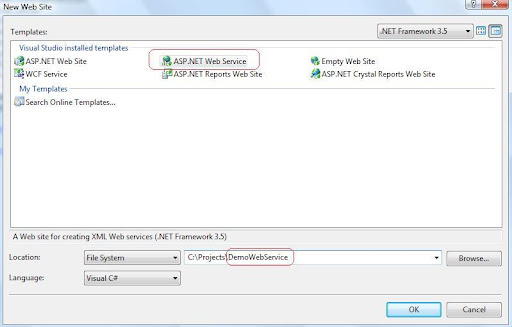
first I have opened a web service from File>New web site > web service named "DemoWebService".

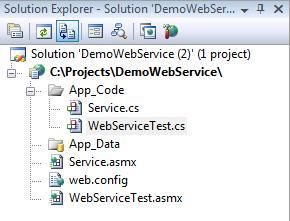
now in the solution explorer we can a Service.asmx file and the Service.cs file in App_Code . I have added another web service named WebServiceTest.asmx so a WebServiceTest.cs file also added in App_Code folder.

we will basically work with *.cs file to make the service.
I opened the WebServiceTest.cs file and there is a demo web method named Hello World. So I will create another method named "GetValue" which will also return a string.

using System;
using System.Collections;
using System.Linq;
using System.Web;
using System.Web.Services;
using System.Web.Services.Protocols;
using System.Xml.Linq;
/// <summary>
///
Summary description for WebServiceTest
/// </summary>
[WebService(Namespace = "http://tempuri.org/")]
[WebServiceBinding(ConformsTo = WsiProfiles.BasicProfile1_1)]
// To allow this Web Service to be called from script, using ASP.NET AJAX, uncomment the following line.
// [System.Web.Script.Services.ScriptService]
public class WebServiceTest : System.Web.Services.WebService {
public WebServiceTest () {
//Uncomment the following line if using designed components
//InitializeComponent();
}
[WebMethod]
public string HelloWorld() {
return "Hello World";
}
[WebMethod]
public string GetValue()
{
string valueString = "the result of your logic.";
return valueString;
}
}
We have to add the [WebMethod]  attribute before starting any method which will serve the web service.

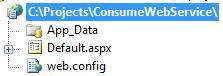
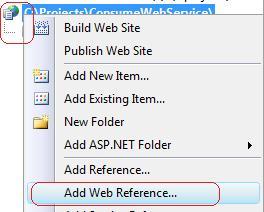
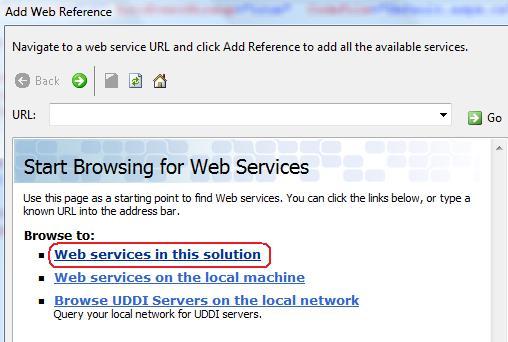
Now i will add another web site named "ConsumeWebService" which will be used to consume the web service. and add web reference to the site as bellow.


for the simplicity I have chosen the Web service in this solution( you can choose you own type as you needed for the further use).
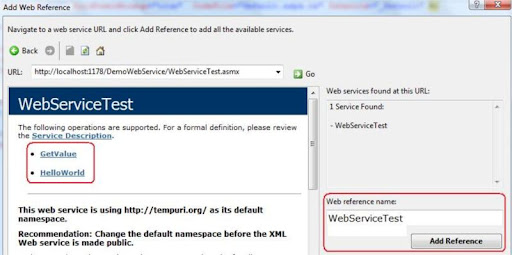
now we will see  our Class file which we have created in our web service, I have select the WebServiceTest for the implementing.  

Now we will sell our methods in the next window, now I have selected the web reference name as "WebserviceTest" and add the reference .

for the simplicity I will skip the  discussion of  *.disco & *.wsdl file,this file are basically needed for communication between our application and web service.

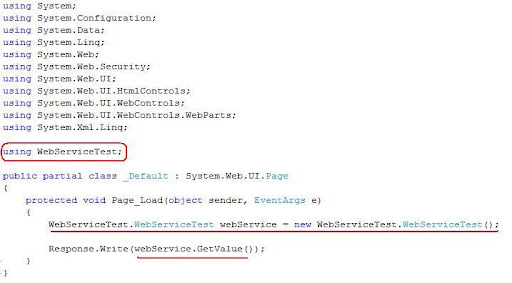
now I open the Default.aspx.cs file and add the WebServiceTest namespace and call the Method of web service as following.

no compile the web site and and enjoy the service.

BYE

Tuesday, October 21, 2008

Captcha generate with ASP.NET & C#

Hello all

Today I will demonstrate how to generate captcha with asp.net & C# . though there are many .NET plugin and controls to serve the purpose but my focus is to generate the a random image and its manipulation with the help of .NET framework.

First open a web project and add a "Web user control" , in the example the name of my control is "ImageGeneratorControl.ascx" . the purpose of the control is to generate a image according to the random character.

Now open the  "ImageGeneratorControl.ascx.cs" file (i used the code behind method for the example.) , to generate image we have to use System.Drawing base class.

firstly we have to make a Bitmap type object where the image will generate, then for the texture we have to take a Graphics type object and manipulate the our random string there, after that we will sat the content type and save the Bitmap object stream so that it may  generate a image file, finally we have to dispose our objects.

there is a method named "RandomString" which will take the length of sting to be generate as parameter, in the method i have generate a random number and convert the number into string.In an addition the string will be save in Session.

The code of the  "ImageGeneratorControl.ascx.cs" is as bellow :

using System;
using System.Drawing;

public partial class ImageGeneratorControl : System.Web.UI.UserControl
{
    protected void Page_Load(object sender, EventArgs e)
    {
        Bitmap objBmp = new Bitmap(100, 30);
        Graphics objGraphics ;
        Font objFont = new Font("Arial", 16, FontStyle.Bold);

        objGraphics = Graphics.FromImage(objBmp);
        objGraphics.Clear(Color.WhiteSmoke);

        objGraphics.TextRenderingHint = System.Drawing.Text.TextRenderingHint.AntiAlias;
        objGraphics.DrawString(this.RandomString(6), objFont, Brushes.Gray, 3, 3);

        Response.ContentType = "image/GIF";
        objBmp.Save(Response.OutputStream, System.Drawing.Imaging.ImageFormat.Gif);

        objBmp.Dispose();
        objGraphics.Dispose();
        objFont.Dispose();
    }

    private string RandomString(int length)
    {
        Random rand = new Random();
        char ch;

        System.Text.StringBuilder randString = new System.Text.StringBuilder();

        for(int i = 0 ; i<length; i++)
        {
            ch = Convert.ToChar(Convert.ToInt32((Math.Floor(rand.NextDouble() * 26) + 65)));
            randString.Append(ch);
        }
        Session["CaptchaString"] = randString.ToString().ToLower();
        return randString.ToString().ToLower();    
    }
}

now we have to place that control in a aspx page (we also can handle it with HTTPHandler but for the simplicity i have used a aspx page which will act as a "GIF" image)

so i have taken a Image.aspx file and register the Control as following:

<%@ Page Language="C#" AutoEventWireup="true"  CodeFile="Image.aspx.cs" Inherits="_Image" %>

<%@ Register src="ImageGeneratorControl.ascx" tagname="ImageGeneratorControl" tagprefix="uc1" %>

<!DOCTYPE html PUBLIC "-//W3C//DTD XHTML 1.0 Transitional//EN" "http://www.w3.org/TR/xhtml1/DTD/xhtml1-transitional.dtd">

<head runat="server">

</head>
<body>
    <form id="form1" runat="server">
      <uc1:ImageGeneratorControl ID="ImageGeneratorControl1" runat="server" />                     
    </form>
</body>

Now this Image.aspx file will act as a Image . What we have to do now is include the Image.aspx page in our main aspx file where the image will be visible. i have used Container.aspx file to generate the captcha as following:

<%@ Page Language="C#" AutoEventWireup="true" CodeFile="Container.aspx.cs" Inherits="Container" %>

<!DOCTYPE html PUBLIC "-//W3C//DTD XHTML 1.0 Transitional//EN" "http://www.w3.org/TR/xhtml1/DTD/xhtml1-transitional.dtd">

<html xmlns="http://www.w3.org/1999/xhtml">
<head runat="server">
    <title>Captcha Page</title>
</head>
<body>
    <form id="form1" runat="server">
    <div><img src="Image.aspx" /></div>
    </form>
</body>
</html>

now you can protect the form from spamming according to your logic,session and image data. 

BYE

Friday, September 19, 2008

Simple unit test with NUnit

Hello all

Today I will show you how to do unit test of a .NET project with NUnit. NUnit is a great tool to do unit test of any .NET project.As its a third party tool so you have to download it from here . I assume that you all are familiar with unit test.For the simplicity I will show you a simple example,Once when you are habituated with this took you will find yourself in many complex test script.

first I opened an new class project named Calculation.Core.

then I added two method which will be tested through NUnit.

The class file's is "Calculation" and those two methods are DoAdd & DoSub which will add two numbers and subtract two numbers.Both's return type and parameters type are integer .

namespace Calculation.Core
{
    public class Calculation
  
{

        public int DoAdd(int firstNumber, int secondNumber)
        {
            return firstNumber + secondNumber;
        }

        public int DoSub(int firstNumber, int secondNumber)
        {
            return firstNumber - secondNumber;
        }
    }
}

now I added another class project named Calculation.Test and Add Reference of the Calculation.Core project. and also make Add DLL Reference of  NUnit's "nunit.framework.dll" from my NUnit's installed location "C:\Program Files (x86)\NUnit 2.4.8\bin\nunit.framework.dll" .This will vary according to your installation of NUnit.

now I have to include namespace in the file by typing :

using NUnit.Framework;

now we have to add the "[TestFixture]" attribute to the CalculationTest class and "[Test]" attribute to the DoAddTest ,DoFailTest & DoSubTest methods.

using NUnit.Framework;
namespace Calculation.Test
{
   [TestFixture]
    public class CalculationTest
    {
       [Test]
       public void DoAddTest()
       {
           
           Calculation.Core.Calculation sub = new  Calculation.Core.Calculation();
           int result = sub.DoSub(3,1);
           Assert.Greater(3, result);
       }

       [Test]
       public void DoSubTest()
       {
           Calculation.Core.Calculation sub = new Calculation.Core.Calculation();
           int result = sub.DoSub(3, 1);
           Assert.Greater(3, result);
       }

       [Test]
       public void DoFailTest()
       {
           Calculation.Core.Calculation sub = new Calculation.Core.Calculation();
           int result = sub.DoSub(3, 1);
           Assert.Greater(1, result);
       }
    }
}

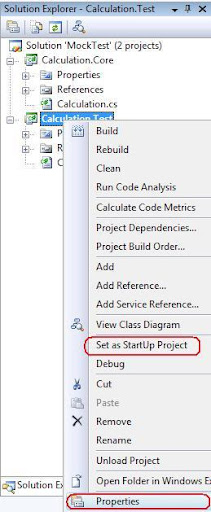
Now we have to select the Calculation.Test project as Starup project and select the "Properties" from the Solution Explorer .

Now form the Calculation.Test tab we have to select Debug then select  Start External Program and set the location of NUnit.exe then select Command line argument and write the dll name of the test project .

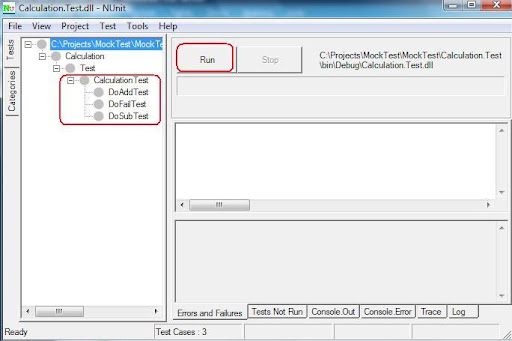
now when we will run the application then NUnit will automatically start and we have to press run button to show the unit test result.

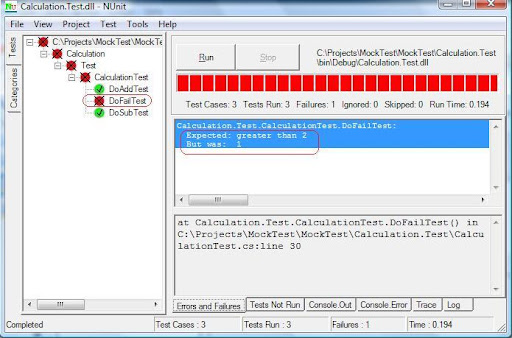
In the result we will see that the two method of our test script has passed but one fail as I didn't give the proper assert method .

in this way we can do unit test with NUnit. There are also many useful method of NUnit's to test the script.
BYE

Friday, August 22, 2008

Simple Web Application Installer with VS2008

Hello all.

Today I will show how simple it is to make a web application installer with Visual Studio.

I have assumed that you have a project already open and now you want to make a installer for it.

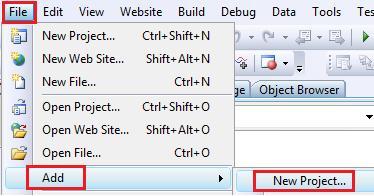
First we have to add a new project from File->Add->New Project

Then we have to select

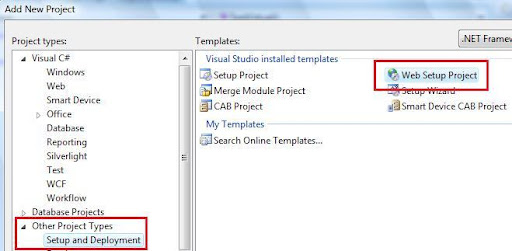
Other Project Type->Setup & Deploy -> web setup project

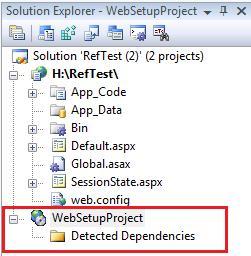
I name it "WebSetupProject" . In Solution Explorer we will found that installer project.

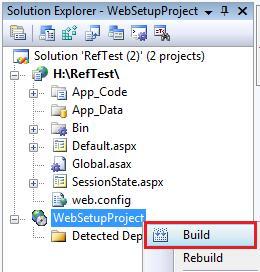
Now we have to right click over the "WebSetupProject" and click on Bulild.

Our basic task is complete now we will get the installer in a the project's debug folder as bellow.

Bye.

Thursday, July 24, 2008

Simple .NET Cookie Management

Hello all

Today I will give a short description about using Cookie with .NET , Cookie is one of the most impotent thing to maintain scalability of server as well as manipulation user's information easier. Generally a Cookie enabled browser can store about 20 cookies for a single domain , so what's happen ;when you try to keep more cookie in a browser for a particular domain it discard the oldest cookie. If you don't set the expiration of a Cooke it will remain in memory till the browser session , when you close browser then the cookie is also expire , but when the expiration is set the the cookie is saved in hard drive.

We can manipulate the cookie in two ways as bellow.

// First Example
 Response.Cookies["index"].Value = "test value first";
 Response.Cookies["index"].Expires = DateTime.Now.AddDays(1);
// Second example
HttpCookie httpCookie = new HttpCookie("NewCookie");
httpCookie.Value = "tast value second";
httpCookie.Expires = DateTime.Now.AddDays(1);
Response.Cookies.Add(httpCookie);

To retrieve the Cookies information we have to do as following . But one thing we all should have to remember that each and ever time when we try to retrieve data from cookie we have to check that the cookie is no "null". If the cookie is null and we want to retrieve data from that cookie it will through an exception.

// First Example
if (Request.Cookies["index"] != null)
    Response.Write(Request.Cookies["index"].Value.ToString());
else
    Response.Write("Cookie not set.");

// Second example
if (Request.Cookies["NewCookie"] != null)
    Response.Write(Request.Cookies["NewCookie"].Value.ToString());
else
    Response.Write("Second Cookie not set.");

That's all for today .

BYE